Reciprocal Teaching in English and Maths

Hi everyone!

I am Kylie and I live in Brisbane, Australia.  I am so honoured to be a part of this amazing collaborative literacy blog and to be networking with such a talented group of literacy specialists!  I am learning so much every day from their posts.


I have worked in adult literacy, numeracy and ESL, in primary teaching and as a Head of Curriculum.  I am currently a lecturer, working with pre-service teachers, which I just love!!!  I am studying my PhD which is around what constitutes intellectual demand in the teaching of reading across the curriculum - that was a mouthful!!!  In a nutshell, it's examining rigorous pedagogies for the teaching of reading.


Today, I am going to be talking about Reciprocal Teaching in both English and Mathematics.  I am really passionate about dialogic approaches that encourage classroom interaction, accountable talk, close reading and higher order thinking.

 
What is Reciprocal Teaching?

Reciprocal Teaching (Palinscar & Brown, 1984) is an evidence-based approach that improves reading comprehension through small group discussions.  It involves reciprocal dialogue between teachers and students.  Teachers can use the Gradual Release of Responsibility model (Pearson & Gallagher, 1983) and through explicit modeling of the strategies, can gradually increase leadership of the groups to the students, to the point where eventually students can lead the groups themselves. 

Reciprocal Teaching is also an excellent approach to use if you have para-professionals, teacher aides or parents helping with reading groups, as it scaffolds the process through prompts on each role card.  You can read a review of the Reciprocal Teaching research here.  Lori Oczkus has cited the following results from the research into Reciprocal Teaching:

In 15 days students are more confident. (Palinscar & Brown, 1986)
Low-performing students do well with reciprocal teaching. (Carter, 1997)
Struggling readers grow 1-2 years in 3-6 months(Cooper, Boschken, McWilliams, & Pistochini, 2000).
In 16 studies reciprocal teaching proved consistent and effective. (Rosenshine & Meister, 1994).
So how does it work?

Reciprocal Teaching traditionally uses four reading comprehension strategies - predicting, clarifying, questioning and summarizing (summarising for those of us in Australia).  The approach can be used in whole class lessons or during guided reading.

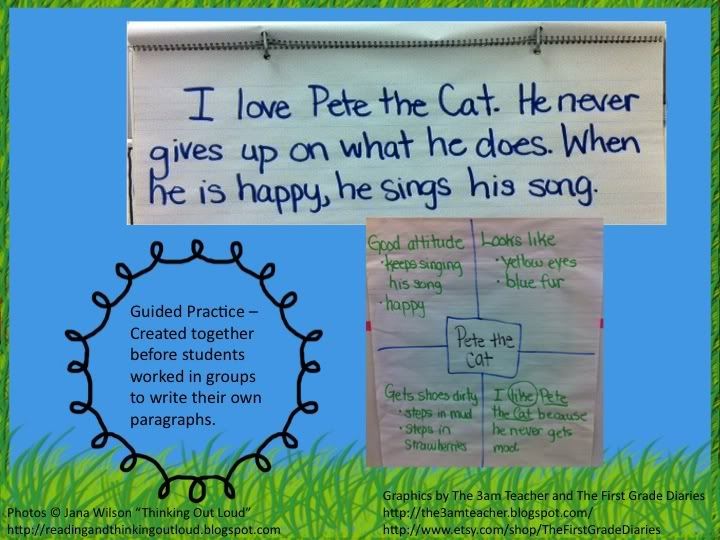
We usually have six students in our guided reading groups, so as a group, we predict what the text will be about before reading, using the title and images to assist.  If it is a book, we might look at the blurb or sometimes the contents page if it is a non-fiction text.  Students usually use a prompt like, "By looking at the cover and the title, I predict this text is going to be about..." Other students add to their predictions giving evidence from the text to justify their predictions.

Students then read a section of the text silently.  They pause at a pre-determined place and identify any words or concepts that need to be clarified.  This may also involve looking up words in the dictionary, using the glossary if the text has one, or searching an atlas for a location.  Students are encouraged to clarify for each other at this point.  The group leader (teacher/teacher aide/parent) may also help to clarify unknown words or concepts after the students have had a go.

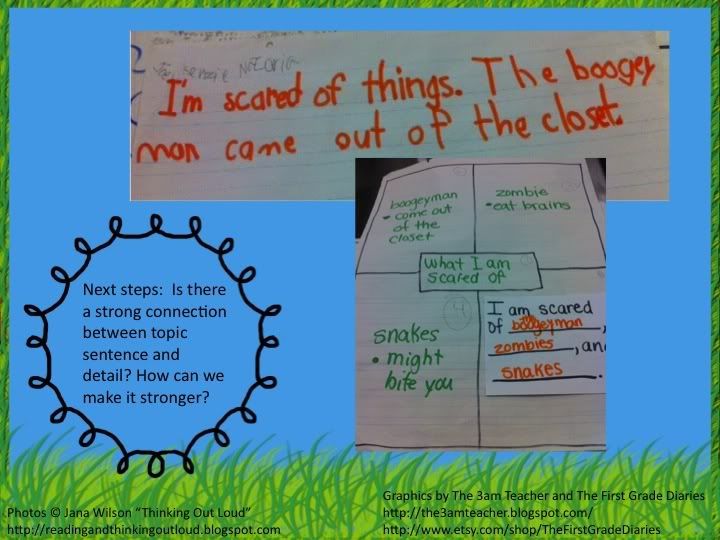
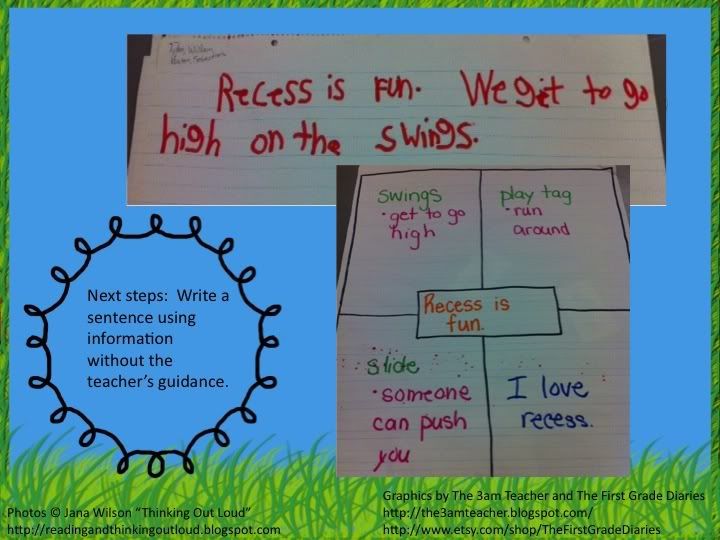
Next, the students ask questions about their reading and attempt to answer each others' questions.  Student-generated questioning is an important part of higher order thinking and deep comprehension.  I sometimes mix this up and I may use an interrogative die (which is just a die with who, what, where, when, why and how on each face).  The students take turns to roll the die and ask a question beginning with the prompt.  This really encourages them to think deeply and laterally when formulating questions.  Other times, I might use a die that has "thick" or "thin" written on each face and the students take it in turn to ask a "thin" (literal, 'right here in the text') question or a "thick" (requiring deep engagement and thinking, beyond the text) question of their peers.  You can find a lesson on thick and thin questions from Read-Write-Think here and free posters here.  The students then summarize (summarise) what has been read so far and add to each others' summaries.

It's up to the teacher's instructional purpose, how much text is read in the reading session and whether the cycle begins again for the next section of text or if that is enough for one day - the important thing to note is that it is not a race to get through the text.  This does take time and the purpose is to generate thinking and deep comprehension, not to speed through the text at a surface level.

 
How does this apply to Mathematics?

I have had great success using the Reciprocal Teaching approach to support the comprehension of Mathematics word problems in small problem solving groups.  


I have extended the process from the original four strategies of predicting, clarifying, questioning and summarizing (summarising) to include: Predicting, Clarifying, Questioning, Visualizing, Connecting,  Calculating, Summarizingand Giving Feedback. This draws on my research around Reciprocal Teaching and also the high yield active comprehension strategies.  I think the "Giving Feedback" role is important as it allows students to monitor how the group is working and helps to support a positive culture in the classroom.

The students predict what the problem is going to be about (based on the Maths in the problem, not whether it is about bees or butterflies etc. LOL).  The students clarify any tricky parts in the problem or maths symbols/language.  They ask each other any questions about the problem; they visualize (visualise) what the problem is asking, perhaps drawing diagrams or tables to assist; they make connections to other similar problems they may have encountered. Next they do the calculations and check the reasonableness of their answers by going back and re-reading the problem and checking they have actually done what the question asked.  
After this, they summarize (summarise) what the problem was asking, how they solved the problem and justify the reasonableness of their solution based on the problem solving strategies used. Finally, they give feedback on the group's problem solving session, focusing on the positives and giving feedback on improvements for the future.  

You can read more about the Reciprocal Teaching resources I use in reading groups and Mathematics problem solving groups, in my blog post here


Resources to support Reciprocal Teaching

Adrian Bruce has some free role/strategy cards that can be used for Reciprocal Teaching on his website. You can find them here.  The Ontario Literacy Secretariat (love their work) provides a summary of Diane Snowball's approach to Reciprocal Teaching here and webcasts on Reciprocal Teaching, Accountable Talk and the Gradual Release of Responsibility model can be found here.

Lori Oczkus has done a lot of work with Reciprocal Teaching and has four puppets ("The Fabulous Four") that she uses to introduce each of the four reading strategies. Click on the image above to find out more.  Her puppets include:  Paula the Predictor, Clara Clarifier, Quincy the Game show host, and cowboy Sammy Summarizer. 

You can view a video of Lori demonstrating this approach here. This is a link to her free video guide where you can download some great resources, including bookmarks to support the Reciprocal Teaching approach.  You can view some vimeos of her approach here.  She uses hand signals as well in her approach.  There is a free professional development study guide that can be downloaded here, and a free chapter from her book is available here to help teachers get started with Reciprocal Teaching.  Ideas for lesson planning and a rubric can be found here, and there are guidelines or advice for classroom organisation, text selection, and planning using the approach here.   

Other terrific suggestions can be found on the Utah Council of the International Reading Association site here and hereThere are also some excellent videos from the Victorian Department of Education and Early Childhood here.

If you are interested in my approach for extending Reciprocal Teaching to include the high yield active comprehension strategies, you can read my published research here. 

I would be really keen to hear from anyone who has used the Reciprocal Teaching approach in either reading groups or for supporting the comprehension of Maths word problems.  Please comment below, as I know there have been many different versions of the approach over the years.

Many thanks to my graphic artist Iva from etsy (nahhan73) for the custom clip art used in my post. I love her work!  Click on the link in brackets to find out more.


18

No More Robot Reading!

Hi everyone!  I am thrilled to be here collaborating with the talented teachers at Adventures in Literacy Land! It is such a fun journey we are embarking on and I am excited that you are joining us!

First, a bit about me. I'm Bex from Reading and Writing Redhead. I grew up in New England and after college went straight to Lesley College to get my M.Ed because I wanted to teach elementary school. Soon afterwards, I began teaching second grade. I love it but have always been an avid reader and had the idea of becoming a reading teacher in the back of my mind so a few years ago I began a program and got my M.Ed in the reading specialist program. I am looking forward to becoming a reading specialist or literacy coach. For now I am delighted to be able to use what I have learned to improve my teaching and help my second grade students. As a member of the teaching team, I also bring my skills and knowledge to the table when we collaborate, which I hope also benefits other teachers who read these blogs.

Today I want to share some ideas with you about fluency.

Teaching children to read can be a challenge! Once they start to get the gist, I start to think of what to do to encourage them to read with expression. It seems like some students just are naturally good at it but others needs more specific guidance than just my first strategy of teacher modeling.

There are a few things I have tried that really help students learn to become better at reading with expression.


I was discussing repeated reading with a colleague recently. Repeated reading of short stories and short non-fiction articles is terrific for fluency in general, as is rereading phrases, but working on phrases, especially those that go from one word, to two, to three, until the full phrase is great. It gives students opportunities to try different voicing.
For example:


I found that the Florida Center for Reading Research (FCRR)  website has some terrific resources in this area and I am using their phrases for my fluency partners right now. We are only using the single phrases, like here (pages 20-24), but I have uses the repeated  phrases like above in small groups with success. A link to their Fluent Phrasing which I use is here, on pages 1-7.


Perhaps one of the best ways to improve student's use of expression when reading is to start at zero on how emotion is expressed in dialogue.

A simple way you can work on this is to come up with a bunch of situations that students could act out in front of the class or in a small group. You could either wing it or write them down on index cards in advance - perhaps even on Popsicle sticks and have students draw them at random when you have 3 minutes to spare. For example, a situation might be: "You think your brother stole your diary and are going to accuse him". Ask the students what you would say (maybe "You stole my diary!", "I know you took it!", or "Don't lie!" ) and ask for volunteers to play the kid and the brother in a brief skit. Really encourage the students to imagine what they would sound like in real life and use that to put some emotion and expression into their voice. I can imagine maybe an example with you showing how it would sound with no expression would have an impact, too.

Here is a cool resource with little mini lessons by Nora Zabst (click here). She states that the goal for students is to work on "using different strategies to read texts with dialogue with expression and prosody". It is broken down into sections: Read fluently by noticing dialogue, understand different ways dialogue can be written, read dialogue by using dialogue tags and more.  Each includes kid-friendly videos that you can show to your students.


Somewhat related to the last idea is Reader's Theater. When you use reader's theater scripts, students are encouraged to use pausing, intonation, and inflection and to read with expression.  I found this is one of my favorite activities to do in RTI Tier 1 with all of my reading groups. There are so many great free resources out there that it makes it easy to implement and easy to differentiate. Little tip: To prevent arguments over who gets what part or having to decide myself, I take the littlest sticky notes, write parts on them, fold them in half, drop them in a plastic bag, and have students pick them randomly. Then I attach the bag to the scripts for the next time. If I have forgotten to do this in advance, I sometimes write each part on a small index card, fan them out upside down like playing cards and have students pick one.

Additionally, there are some videos that show students using great expression which are useful for teachers but also could be shown to students as an example. Check this one out from The Balanced Literacy Diet channel on YouTube:


Reading (and writing poetry) is one of my all time favorite things to do with students. It is so rich with opportunities. When reading poems like those of Shel Silverstein or Jack Prelutsky, it can seem easier for students to use expressions. Rather than rephrase what someone else has explained well, check out this great resource from the site Poetry Teachers (click here). It has a terrific short poem ( I think short poems are great to start with when working on using expression- start short and work on longer poems over time) and discusses varying pitch, volume, rate, and what words could be emphasized.

What are your favorite ways of helping students learn to read with expression?


4

Monitoring for Miscues: Prompting Readers to Stop and Think


 Hello literacy lovers!  To be a part of this wonderfully talented group of bloggers is an honor, and I am learning so much and have been so inspired and encouraged. My name is Lauren from Teacher Mom of 3.  Literacy has been my passion since I was a toddler sitting on my mother's lap as she read to me. I have been involved in education in some shape or form for the last twenty-five years.  I began my career as a high school literature teacher and have since taught every grade from preschool to grade twelve (with the exception of grades nine and ten) in some capacity. 

My experience includes working as an ELA classroom teacher, a literacy resource teacher, teacher mentor, reading specialist, and literacy coach.  I hold a B.S. Ed. in English and an M.Ed. in Reading and hold reading specialist certification in PA and MD.  My newest adventure is homeschooling my first grade son, and so far we are both loving it!  My middle son is a second grader in our local public school, and my oldest son is a sophomore in college.

Although I am not Reading Recovery certified, my reading specialist program and clinical work were infused with many Reading Recovery theories and instructional strategies.  As an elementary reading specialist, I am fascinated with observing, analyzing, and planning focused instruction for struggling readers.  One such area that I am interested in is a reader's use of self-monitoring strategies during reading.  Monitoring is so critical for readers to be able to implement the strategies and skills that we teach them.  To be able to use these "tools" independently is the goal.  If students do not know how to monitor, reading will continue to be a laborious process that is neither enjoyable nor effective. Moreover, emergent readers may never learn to self-correct, therefore impacting their comprehension.


What is Monitoring?
Simply put, monitoring is when a reader notices mismatches and errors (miscues) while reading, specifically decoding.  As well, good readers also monitor for meaning when reading to make sure they are comprehending. Depending on the child, I usually start with teaching students to monitor for decoding using the three cueing systems. If we want our readers to be independent readers who use "fix-up" strategies, who make multiple attempts while reading, who self-correct, and who are proficient readers, we need to teach them how to self-monitor.  We know that effective readers are active readers who think throughout the reading process.  Marie Clay (2005) shares that monitoring and using what you know in an active way helps to support what she calls "fast processing".  Likewise,  Fountas and Pinnell (2009), state that a teacher's goal is to help readers develop "fast brain work" (p. 348).

For this post, I will focus on monitoring while decoding, which includes readers using visual, syntactic, and meaning cues.


Why Some Students Do Not Monitor

Proficient and advanced readers consistently monitor their reading in a sophisticated manner, both when decoding and for comprehension.  In contrast, struggling readers and some on-grade level readers do not.  Before you can teach explicitly for monitoring, you need to try and determine why a student is not monitoring.  I'll use my first grade son as an example.  He is reading at a Guided Reading level of "L"- above grade level. However, he does not always comprehend what he reads because he does not monitor for decoding errors when he is reading. Often, he will make an attempt that he mumbles and that sounds like a nonsense word.  But, he keeps reading away, often reading too fast, as if he just wants "to get this finished".

But why does he do this?  
Here are a few reasons why some readers do not monitor:

1. They do not know how to say the word or how to fix the error.
2. They do not want to stop reading.  They may be reading too fast.
3. They are frustrated and are working so hard to decode sight words that to spend more energy on a tricky word is too much work.
4. They do not have much confidence.
5. They are not aware of the cueing systems they should be using.


Knowing why a student does not monitor is a starting point for planning explicit instruction.  If you are not able to work with students individually, you can still address needs in a whole-class mini-lesson and /or by creating strategy groups.  I use flexible grouping in the classroom where I will sometimes group students with similar needs, such as monitoring.


 How Do I Teach For Monitoring?

To begin, first determine the cueing system(s) that the student is using, if any.  Many students will rely solely on visual cues and need to be taught and encouraged to use syntactic and meaning cues.  For my son, he was adding letters when reading (truck for tuck) and ignoring medial letters, especially diphthongs.

Be very specific in determining your goal for the student and the prompts that you will use.  For my son, we are working on the initial letters and using visual cues.  If he says "truck" for "tuck", I will respond, "Does that look right?".  It doesn't look right because one would expect to see letter "r" after the "t".  Pinnell and Fountas recommend keeping the prompts very simple for readers at an A-C level.  For me, I find that I often have to keep it simple for many kids reading at a higher level.  It is suggested that teachers do not use complex prompts.  What this means is do not ask students to use all three cueing systems at once ("Does it look right, sound right, make sense?").  Instead, focus on one system at a time, as I mentioned earlier.  

Use a Think Aloud to model and share your thinking.  For example I might say: " I am stopping because I said the word truck, but it doesn't look right because I would expect to see letter "r" after the "t" and I do not see it.  I will reread the page again and try to fix it" (here you are also modeling a fix-up strategy and cross-checking).  Then, use prompts to have students try monitoring on their own.  Here are some prompts that you can use to get you started.  Just click on the image below to download a PDF version that you can print.

Frame by Creative Clips:  Font by KG Fonts

Here are just a few more tips that I have found helpful when working with students:
  • If the student notices part of the word, they are still monitoring to some degree.
  • Tell students that they need to stop if the word/reading does not look right, sound right, or make sense.
  • Struggling readers and/or those with low confidence will often be  very passive.  They will need a lot of praise and encouragement.
Speaking of praise, it is very effective to use specific praise.  Instead of saying, "Good job!" when they finish reading, praise them on something very specific that they did- that you heard or observed.  A few examples would be:
  • "Stopping when it doesn't sound right is what a good reader does"
  • "I like how you stopped, noticed the mistake, and tried to fix the word."
  • "I like how you stopped reading because you knew it didn't make sense"
  • "I like the way you tried to figure out the word on your own"
  • "I like how you used your finger to slow down your speed so you didn't miss any letters or words."


Hopefully, this has provided an overview or a refresher on how to explicitly teach young readers to self-monitor.  Click here to view and print a teacher observation prompting guide from Fountas and Pinnell.  See "Part 4:  Self-Monitoring".  It makes a nice little "cheat sheet" for you to keep in your lesson plan binder until you have internalized the prompts. 


How do you teach self-monitoring?  What methods have you found successful for teaching monitoring and self-correcting?  Please share your ideas and comments!


Sources:  When Readers Struggle  Teaching That Works (2009) by Pinnell and Fountas
               The CAFE Book  Engaging All Students in Daily Literacy Assessment and Instruction (2009) by Gail Boushey       and Joan Moser

Frames in Graphics by Creative Clips.  Fonts by KG Fonts


10

Text Tracking Tools for Guided Reading!

Hi again, everyone!

I'm Jenny from Luckeyfrog's Lilypad and I am so thrilled to be posting here on Adventures in Literacy Land for the first time on my own!

A couple of weeks ago, my second grade group and I started a strong focus on fluency.

Fluency is such a tough thing to teach sometimes, because students mistake speed for fluency. When I introduce fluency to my students, we talk about how it is "not reading like a robot." and I give them four guidelines: PASE (Pausing, Accuracy, Speed, and Expression.)


You can read more about how I introduce fluency to my students (and how to get these bookmarks for free) here.

One of the things that I notice them doing is pointing under each word, but one. at. a. time. I tell them when they move their fingers like robots, it's no wonder they read like robots! I encourage my students to move their fingers smoothly to read smoothly.

Moving your finger under the words isn't exactly something my second graders love to do, though... so I like to make it more fun! I have a collection of special text pointers in my room- and they were ALL purchased for under $5.


I think these were intended originally as fancy toothpicks for in food, but I found them on clearance at Wal-Mart. They are perfect for highlighting a word or part of one. (I particularly love to use them for my students who need to 'chunk' a word and look at one part at a time.)


Weirdly enough, I have found some drink stirrers from a party supply store to work well, too! (As a bonus, these can be turned horizontally and can help a child highlight a line of text- perfect for those with trouble tracking each line!)


My students have also loved these tiny finger puppets, which I found at the Target Dollar Spot!


They were winter themed- perfect for reading seasonal books (and even for retelling some stories!)


Far and above, though, my students' favorite tools for tracking text are the finger lights. I originally found these at Half Price Books, but I just found them at REI today and they can be ordered on Amazon, too!


The little elastic strap fits around your finger, and you can point a light at the words. They come in red, blue, green, and white. These are fun in any context- but if you let students go under a table or even turn out the lights to read with these, you will quickly become "the coolest teacher ever"- and your kids are forced to track smoothly with the lights, too!


With my older students, of course, I don't typically encourage students to track with their fingers or other tools... but for those who struggle with fluency or moving through the word to check all of the sounds, these special text tracking tools have really helped my students- and they LOVE when they get to use them, too!

Do you have any special tools that your guided reading groups LOVE getting to use?


9

Focused Questioning Strategies For Vocabulary Development by: The Reading Tutor/OG

Greetings from Literacy Land! I'm Emily from The Reading Tutor/OG, and I'm thrilled to be here with all of you! So, who needs strategies for teaching vocabulary? If you're like me, I'm always seeking new and innovative ways to help children build their vocabulary development beyond the traditional list of words. More on that in a minute.
 
First, let me share a bit about myself. Years ago, I pursued a Master's degree from Lesley University in Curriculum and Instruction with a Specialization in Literacy.  I taught in a classroom for over 13 years. Now I am home with twin toddlers, with a third on the way next month!  I am a private Orton-Gillingham instructor, but I also tutor children who struggle with writing.
 
Before teaching elementary age children, I worked with toddlers and preschoolers. I've worked with children mostly in grades 2-5 in inclusive settings.  It required a great deal of collaboration and communication.
 
Although I love teaching all subject areas ( I really do!), I'm most passionate about Literacy. Several years ago, I pursued training in using the Orton-Gillingham approach to help dyslexic learners with reading. Going through the training really helped me to understand dyslexia, recognize the red flags, and learn how to support struggling readers in a way that would help them succeed. Learning that 1 in 5 people actually have dyslexia was fascinating to me!

A few months ago, several of my lovely teacher bloggers recommended that I pick up the book Bringing Words To Life: Robust Vocabulary Instruction by Isabel L. Beck, Margaret G. McKeown, and Linda Kucan and boy, am I glad that I did!
http://www.amazon.com/Bringing-Words-Life-Second-Edition/dp/1462508162


I had done a post on vocabulary development within the Mystery genre for teaching story elements. Some of the activities I created were discussed in this book, and I had never even read it before! One strategy from the book is teaching your vocabulary words in the form of questions to create and facilitate discussion. Children need multiple exposures to vocabulary in a variety of ways. Using the questioning strategy with newly taught vocabulary opens up a level of interaction and engagement that will give language development a big boost. This is critical practice for children with language impairment or word retrieval issues.
After finishing Bringing Words To Life, I decided to create a set of question cards based on the book's suggestions with a series of generic questions where I could fill in any vocabulary words I needed. That way I would have them ready for any text. Then, I went a step further and created eight more cards for the book Penguin Chick by: Betty Tatham.

http://www.amazon.com/Penguin-Chick-Lets-Read---Find-Out-Science/dp/0064452069/ref=sr_1_1?s=books&ie=UTF8&qid=1390650574&sr=1-1&keywords=penguin+chick

This was a required text I used with my third graders. Although very high interest, the book had about 10 words that may seem new or present a challenge to some of my readers.

Here is a list of the Tier 2 and 3 vocabulary I selected to try the questioning strategy with Penguin Chick:
webbed, brood patch, rookery, tobogganing, krill, huddle, down, trumpets, preen, and creche.

You'll notice these words are a combination of both Tier 2 and Tier 3 vocabulary because some have multiple meanings, while others are content specific. Take a peek at the question cards:

Generic Question Cards: These questions would work really well with introducing character traits, since you'd probably need an adjective to fill in each blank.


Question Cards for Penguin Chick: These cards are more specific to the text, but provide a level of engagement where students have to use their knowledge of the book vocabulary to be able to discuss them in a meaningful way.


Sometimes when a student explains the meaning of a word, their explanation can seem tacit, or surface level. When creating vocabulary questions, I found these tips useful:
  • Keep questions open-ended.
  • Place the word in a "what if" scenario.
  • Create an "either or" questions or a "which would you rather" question.
  • Make a pros/cons question. "What are the benefits of...?"
  • Have a question that compares and contrasts the vocabulary word to another word.
  • Make sure your students are making a connection with the word by posing a question that asks them to rely on their schema.
Using the question cards raises their level of understanding, and really gets your children actively talking about words! You can use them at the beginning of a lesson as a whole class, pair students up and give them a card, or use them during a guided reading lesson.
Click the link below the image to print out a copy of the cards I created to use with your own students!
https://drive.google.com/file/d/0B1IfP1qg39PPSm9LRnlBLVVjd1k/edit?usp=sharing
 
 
I'd love to know how you incorporate effective strategies for teaching vocabulary in your classroom. Please share in the comments! Thank you for visiting Literacy Land today!


29

Unlock Your Brain: Activating Schema

Hi everyone! It's Melissa from Don't Let the Teacher Stay Up Late, and I'm so excited to share my first post on this blog. For those who don't know me, I've been teaching for 8 years in a small county near Richmond, VA. This is my second year as the Title I Reading Specialist for grades 3-5, but I spent most of my time in fourth grade. I love working with older kids and focusing on comprehension skills.


Today I want to share one of my favorite words: SCHEMA. When I began my master's program four years ago, I had never heard of the word. It's just a fancy word for prior knowledge, but it sounds so much more fun! As strong readers, it's not something we really think about because it just comes naturally to us. However, we got that way from LOTS of practice.

I like to teach schema at the very beginning of the year, and yes, I use the word schema because the kids think it's a cool word, too. Plus I tell them they can go home and teach their parents a new, fancy word. When I introduce it, I explain that schema just means "what we already know". I tell them it's like our brain is a filing cabinet and certain words tell our brain to pull out a file. Then I usually say "dinosaur" and ask them to tell me what things they thought about. They give a lengthy list (I don't write it down, but I would if the kids were a little younger). Then we discuss where they learned this information. I only said one word, but they were able to give me plenty of information.

After they have an understanding of what the word means, I show them how it applies to reading. I choose a book, and we activate our schema (I pretend to turn a key on my brain to open the filing cabinet) on the topic. I recommend beginning with a nonfiction book, and it's important that the topic is one your students are comfortable with. As they call out information, WRITE IT DOWN! You can have them write it on a sticky note and sort the information into categories, or you can just list the information. Then I show the students the book cover. That may jog their memory for a little more information.

I explain to the students that they will need this information to help them read the book. Sometimes it will help them understand words that are unfamiliar (context clues). Other times it will clear up information that the author doesn't completely explain (making inferences). I tell the students that good readers use their schema all the time. Before we read, I have them explain to me what schema means. I see a lot of them "unlock their brains".

The most important step is to begin every story that you read with the class by activating their schema. This doesn't have to be long, but they need PRACTICE!! This won't become a habit without a lot of modeling and practice. It's also important because there will be times when students don't have sufficient background knowledge, and they will need help BUILDING their schema.

A few recommendations for quick prior knowledge checks:

  • sticky notes
  • 20-30 seconds to share one fact with a buddy
  • draw three names to share one fact
  • short journal writing for morning work

Since this is my second year in this position, I've been able to see how much some of my students have retained from year to year. They don't always remember the word, but all I have to do is "unlock my brain" and they know exactly what to do. I've noticed that they are more engaged in the topic from the beginning, and it makes teaching future skills a lot easier!

What is your favorite book to practice activating prior knowledge?


4

Helping Students Stay on Topic

Hello new friends!  I am very excited to be joining a wonderful group of teacher bloggers as we embark on this new Literacy Land adventure.  I began my journey in education as a middle school social studies teacher.  I went to a professional development about incorporating reading strategies across content areas and I started thinking that maybe I wanted to teach reading instead.  That opportunity arose in my district and I became the seventh and eighth grade reading teacher.  Did I have any idea how to teach reading?  NO!  So I went back to school and got my master's degree in reading.  After teaching reading for a few years, I was given the opportunity to become a literacy coach for grades 4-7.  While I was coaching, I achieved National Board Certification in Reading/Language Arts.  Currently, I am a Master Teacher (instructional coach/facilitator...there are so many names that mean the same thing) for grades preschool through third grade.

As part of my job as a master teacher, I have to analyze our test data to determine an area that needs to be focused on school-wide.  Once I have narrowed down the focus, I research strategies that would help our students succeed in that area.  One of the great things about my job is that I don't just tell my teachers, "Go try out this strategy because this book/article/website said it would work."  I have to field test, or try it out, first with a group of students in our school.  Once I work the kinks out of the strategy, I present it to my teachers in manageable chunks.  Looking at the data, we were struggling with creating a piece of writing that stayed on topic and was organized.  What to do?

I researched and found the four square writing method and began to try it with the first grade students my first grade teacher graciously loaned to me.  We worked on using the graphic organizer for a couple of weeks before we picked one of the graphic organizers and wrote our first piece of text.

Step One:  Model, Model, Model
It doesn't matter what grade I teach, I am always impressed by the power of modeling.  I modeled how to turn the information in the graphic organizer into sentences to write the paragraph.

Step Two:  Guided Practice
In the next lesson, the students and I worked together to start our paragraph.  We used a graphic organizer that we had previously completed together.  We only focused on the topic box and the first detail box.  The next lesson took the remaining boxes and turned them into sentences.  I wanted to take a piece at a time, so I had the opportunity to assess them before we wrote the whole paragraph.


Step Three:  Group Practice
Before taking the plunge and having the students write their own paragraphs, I wanted to give them more practice by working together in groups.  Each group was given a different completed graphic organizer (each one had been completed during guided practice earlier in the unit).  They were also given a half-sheet of chart paper and a marker.  The groups had to write the beginning of the paragraph that would match their graphic organizer.  After they completed the beginning of the paragraph, I assess by reading and writing down next steps.  I used the next steps to plan my small group writing time.


Are these the best sentences ever?  No.  Could they use some style?  Yes.  Am I happy with the product?  Yes!  Our goal has been to make sure that the details they use in their writing match the topic.  The next steps are to finish this draft, revise, edit, and write a final published copy.  The published pieces are going to be displayed in the hallway.  All we are working on is content and I am pleased with our beginnings.

The students were excited about working together to create a piece of text.  One group finished quickly and asked for another graphic organizer.  They wanted to keep writing!  I left school with a smile on my face thinking about how excited they were to write.

What's next?
Now that students have experienced success creating a piece of text with a group, it is time to move them into independently going through this process.

I would love to hear how you help your students organize their writing and stay on topic.  Let me know in the comments.


http://readingandthinkingoutloud.blogspot.com

7