Adventures in Literacy Land: Guided Reading

Showing posts with label Guided Reading. Show all posts

Adding Multisensory Techniques

I think what makes someone a good teacher is the constant desire to learn and grow.  That is why we read, follow, and comment on blogs.  We are always looking for more ways to improve our craft, help our students, and grow as professionals.
Over the past few years, I have worked hard on my guided reading routine.  It has changed as I moved from classroom teacher to pull out Title I teacher to push in Title I teacher.  It has changed as my time allotment has increased or decreased.  It has changed as my kids have changed.


This year my guided reading routine changed again.  (You can read a full break down of my routine over at Curious Firsties.)  I saw some gaps in what I was doing; therefore, I attended some PD and completed some observations of the OG teacher in my building.  And what it came down to is that I wanted more multisensory teaching to be occurring.  But...it had to be efficient and effective because (as we all know) time is precious.

Here are a few multisensory techniques that I have included in my daily routine.  (I still have room to grow, but this is a start.)

When it came to sight words, I have always used flashcards and then we found those words in context.

Now I do a few different things:
First I introduce the word orally and visually with these sight word cards from Child1st.


Once the word has been introduced, we do a "mix and fix" with letter tiles.


As a student is "fixing" the word, the other students are finger spelling the word on the table.  Then they all write the word using a pen and a textured placemat.


These additions only take an extra 2 minutes to my group because of the way that I have them structured.  But they have made a BIG impact on my students.

I am testing out some other multisensory techniques (such as the power of scent for some vowel sounds) but I am not quite perfected these yet :)

What multisensory techniques do you include?


2

Center Survival! Three Keys to Success during Independent Centers

Center Survival! Three Keys to Success during Independent Centers

1.  What is your favorite time of the day?
2.  What is the most crucial time of the day for independent learning?
3.  What is the easiest part of your weekly lesson plans?
4.  What needs to be based on routine, routine, routine?

OK...by now you know the answer to all of these should be center time.  If it isn't, I hope to convince you to change your mind about centers.  If it is, I hope I can give you at least one new idea to think about and maybe even implement.

I cannot emphasize enough the key to centers is routine. From Day 1.  No excuses.

Set-Up and Classroom Management

This is so very important...your room has to lend itself to independence.  The more independence your child has, the better centers will be.  The set-up of your room and materials cannot be overlooked.  When teachers and I work together to make centers work in their rooms, we make sure center areas are clear.  Each center has a table or group of desks and a designated shelf.  To make sure everyone knows about the center areas, signs are hung from the ceiling.  These signs are universal in the room, as they will be on the shelves, the bucket for materials, and the center board for self-directed centers.  Students know where to get and return materials and where the center rotation takes them.

Center Expectations

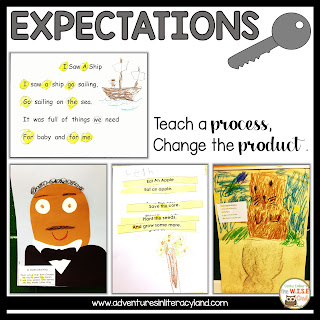
Expectations are key.  Students must need to know what is expected or they can't give it to you.  It's that simple.  Centers are NEVER the new skills.  If you want centers to be independent, they must be review skills.  If your lessons are the "I do, we do, you do" method...centers is without a doubt the "you do."  The best method for keeping sanity in the room and sanity in your plans:  CHANGE THE PRODUCT, NOT THE PROCESS.  If the ABC center is practicing rhymes, let them do it for several weeks in a row.  Change the rhymes, but let the exercise for rhymes be the same.  If the word wall word center is a "Read It, Write It" sheet, change the words on the paper, but the process is the same. My poetry center is always the same...just a different poem.  OH, and I forgot to mention, my poetry center and art center are ALWAYS the shared reading poem from the week before. They know it, they don't need help.

Center Self-Monitoring

Finally, students must be taught to self-monitor.  Part of this goes hand-in-hand with expectations.  Students will know what to do...you've covered that!  Students will know how to do it...you've covered that.  The last thing you need to do is let them know what to do when they are done. If you have a teacher assistant, students should be taught to raise their hands and get their work checked.  The TA will look over the work, decide if it's done, then tell them to "stamp it and put it away."  That's right.  Let them stamp their paper and let them file it.  They can do...it's part of their job.  If the student did not complete the assignment or if something needs to be fixed, the TA should ask them to check the example and fix the problem.  Don't get in the habit of telling them how to fix it, they need to do it.  If you don't have a TA during that time, then an additional step must be added.  Students should know to "get a book" or add a "fill activity" (something familiar to fill the time until you are done with a reading group).  You pull a reading group while they work.  When you are done with the group, you rotate and check and move to the next group as they move to the next center.

I could go on and on.  I can talk centers all day...but that's a good start.  Routine is the key!


3

Literacy Center Organization


Hi everyone!  It's Jennie from JD's Rockin' Readers!  Are you as overwhelmed with school right now as I am?  This time of the year is just crazy!  We are finishing assessments this week and then grade cards go home next week.  Then, it's Parent Teacher Conferences right before Turkey Day!  I am always ready for Thanksgiving Break more than any other break we get throughout the year (except summer of course). 

Today, I am going to share with you how I run my Literacy Centers so that I can work with my Guided Reading groups.  

First off, my teaching partner, Mrs. Kruse, and I do Center Time together.  This picture is from my classroom looking into her classroom. We have sliding doors that we open each day during this time.  Our center block usually lasts between 45 minutes to an hour.  I try to get in 2 or 3 Guided Reading Lessons during this time.

WE OPEN THE CLASSROOM SLIDING DOORS


ROTATION BOARD


We do three center rotations a day.  We each have four different groups.  All of my groups are a mix of ability levels.  We regulate the time that the students spend at each center activity.  It is usually between 15 and 20 minutes.  Our Listening Center is our guide for how long they are at each center.  We usually put two books at the Listening Center that last about 12-15  minutes total and when that group is finished, then we switch by ringing a bell.  Students know to switch to their next center unless they have not finished their first center.  If they haven't finished, they must finish and then go on to the next center.

LISTENING CENTER


This is our Listening Center.  We have the same cards out there as we do on our rotation board.  We use arrows to tell who is in charge of running the center that day.  We have our Listening Center set up  in the hallway right outside of our classroom.  It's nice because we can have them listen to the stories without headphones and Mrs. Kruse can still see their every move from her Guided Reading table.

We do a mix of Daily 5 and regular Literacy Centers.  For our Work On Writing center, we just have the students get their Writing Workshop folder out and they get extra time that day to work on whatever writing they are doing during Writing Workshop.  

WORD WORK, SPELLING WORDS, AND SIGHT WORDS


These centers are kept in Mrs. Kruse's room.  All of the materials needed for these centers are in this storage container.  We usually have two different options for Spelling Words and Sight Words.  They have a list of their spelling words in their Center Folder to use (this is also where we put any paper/pencil work for the week).  At the end of the week, I take a quick glance to make sure they are completing their work.  I staple it together and send it home.  Our weekly sight words are on a pocket chart in the classroom for them to use as a reference when they go to the Sight Word center.  Our Word Work center is usually an activity that helps the students practice the phonics skill that we are working on that week.  For example, this week we are doing a WH write the room activity.  This also goes along with the skill on our spelling test this week.

POETRY CENTER


The Poetry Center is kept in my room.  The poem that we use each week is one that we have read everyday the week prior to putting it into the center.  The students are very familiar with the poem and can read it on their own.  They put the poems into their Poetry Notebook and have some sort of activity to go with it.  (Sometimes we have parent helpers help with this center).  Most of the poems I use come from Jane Loretz.  She has MANY different Interactive Poetry Centers for sale in her store.

iPADS


We also have an iPad center.  At this center, the students are allowed to go to different reading apps that we have on the iPads.  Our ultimate goal is to have them using and reading books from their Raz-Kids account- but it isn't set up yet:(  It should be very soon though!  I can't wait for them to be able to be reading books at their level during this time.

During our Read to Self time, students are allowed to choose whose room they want to go and read in.  We built up our stamina at the beginning of the year and they do a nice job with getting their browsing box and reading to themselves.

During our Read to Someone time, students meet in the middle of the two rooms (where the doors open) and raise their hand.  This means they are looking for a partner to read with.  We allow students to read with another student from either room.

Here are some fun Sound/Letter Boxes that you can use during your Guided Reading Lessons!


I LOVE having this time to work with my kiddos at their reading level.  We can get so much accomplished during this time by using The Ultimate Guided Reading Toolkit that I made.  It makes planning a breeze and the activities are fun and effective:)  

If you are interested in purchasing The Ultimate Guided Reading Toolkit, try to get your school to purchase it by using this FREE download explaining the product to your principal.  It also includes directions on how to purchase with a School Purchase Order.  Multiple licenses are at a reduced cost.  What do you have to lose??  

I'm sure I haven't covered everything, but I know I am always interested in how others set up their room and their Literacy Centers.  I am happy to answer any other questions that you might have:)


2

Guided Reading Binder {Freebie}

Hi!  It's Jennie from JD's Rockin' Readers!

I hope everyone (that is on summer break) is enjoying your time off!  Since school has been out, I have serious been in DO NOTHING mode.  I will be taking a vacation soon and am hoping that I will get back to "work".  I have so many summer to do's and I really need to get busy...

  I thought I would share a freebie with you that I use to help me organize my Guided Reading Groups.   

This is what I use to help me stay organized.
I have my leveled groups.  I use kindergarten benchmarks to get an idea of their reading level at the beginning of the school year.  I'm sure I will be doing some moving around of my groups early on.
I have my supplies ready to go (whiteboards, markers, erasers, sound boxes, wikki sticks, highlighter tape, word windows, magnetic letters) along with my Ultimate Guided Reading Toolkit with Guided Reading Lesson Plans.  These help me stay on track of what I need to teach.

Here is a FREEBIE for you to help you get organized too!


I use velcro dots so that I can change my guided reading groups easily!  Just take off the name and move it to another group when needed.


0

Reading Response Spinners

As a reading specialist, I’m always looking for ways to make reading intervention more fun. My kids need a lot of repetition with the same things, but in a motivating way!

There are a few story elements that I like to review after every fiction book we have read- and to make it more interesting, I picked up some supplies from the Dollar Tree and created some Reading Comprehension Spinners!

IMG_4446

On the blue pinwheel, I just used a Sharpie to write Main Idea, Main Character, Setting, Problem, Solution, and Author’s Purpose. I did have to write quickly because the Sharpie wanted to bleed through a bit. No big deal, though!

IMG_4399

While I was on a roll, I made two more spinners, too- one for reading responses (the green) and non-fiction (pink). I labeled them with washi tape.

IMG_4430

So, for a grand total of $3, I have 3 spinners! These would be great in the regular classroom, too, for quick review after a read-aloud!

IMG_4419

When I use them with students, I spin it and let them stick their finger in to stop it. If we’ve already stopped on that one, we turn to the next one that hasn’t been done.

The reading response one may be my favorite, because I can spin it once and have all of the kids respond to that prompt! How do you review common reading comprehension questions like story elements?

jennybuttontitle

14

Word Attack Strategies!


When I work with my students during guided reading, I really focus on helping them develop good "word attack" strategies. I keep this anchor chart up for them to refer to. When they are stuck on a word, I always ask,"What strategy are you going to try?" Sometimes it takes more than one, but usually the strategies get the job done! After reading together, we even added another one (after I took this picture). The fifth one is: Look for chunks you know. This has actually ended up being one of the most popular ones! So here is a quick list of the strategies we use:

1. Look at the picture.
2. What would make sense?
3. Look at the beginning letter.
4. Skip it, read to the end of the sentence, then go back.
5. Look for chunks you know.

I use these strategies with all the grade levels I work with. I have really been pushing the strategies with my third graders. They wanted to sound out every word! I told them now that we were reading harder books, the words were getting too long to sound out. My third graders are also still working on learning several phonics rules, so their sounding out often was not successful. To break them of this "sounding out habit," I made a checklist.


I made a small list of the strategies for each student to have in front of them. I laminated the strategies so that students could check off the strategies with a dry erase marker as they used them. It has been a huge success! I am so pleased! My students are really starting to use these strategies instead of sounding out. I find it very interesting how certain students favor different strategies. Some students prefer to use a couple of the strategies over and over, whereas other students like to use every single one in a book. Differentiation at its finest, right?!


If you would like a copy of the strategies, click here, or on the picture above. I hope your students find them as useful as mine do!

What word attack strategies do you use with your students?


4

Text Tracking Tools for Guided Reading!

Hi again, everyone!

I'm Jenny from Luckeyfrog's Lilypad and I am so thrilled to be posting here on Adventures in Literacy Land for the first time on my own!

A couple of weeks ago, my second grade group and I started a strong focus on fluency.

Fluency is such a tough thing to teach sometimes, because students mistake speed for fluency. When I introduce fluency to my students, we talk about how it is "not reading like a robot." and I give them four guidelines: PASE (Pausing, Accuracy, Speed, and Expression.)


You can read more about how I introduce fluency to my students (and how to get these bookmarks for free) here.

One of the things that I notice them doing is pointing under each word, but one. at. a. time. I tell them when they move their fingers like robots, it's no wonder they read like robots! I encourage my students to move their fingers smoothly to read smoothly.

Moving your finger under the words isn't exactly something my second graders love to do, though... so I like to make it more fun! I have a collection of special text pointers in my room- and they were ALL purchased for under $5.


I think these were intended originally as fancy toothpicks for in food, but I found them on clearance at Wal-Mart. They are perfect for highlighting a word or part of one. (I particularly love to use them for my students who need to 'chunk' a word and look at one part at a time.)


Weirdly enough, I have found some drink stirrers from a party supply store to work well, too! (As a bonus, these can be turned horizontally and can help a child highlight a line of text- perfect for those with trouble tracking each line!)


My students have also loved these tiny finger puppets, which I found at the Target Dollar Spot!


They were winter themed- perfect for reading seasonal books (and even for retelling some stories!)


Far and above, though, my students' favorite tools for tracking text are the finger lights. I originally found these at Half Price Books, but I just found them at REI today and they can be ordered on Amazon, too!


The little elastic strap fits around your finger, and you can point a light at the words. They come in red, blue, green, and white. These are fun in any context- but if you let students go under a table or even turn out the lights to read with these, you will quickly become "the coolest teacher ever"- and your kids are forced to track smoothly with the lights, too!


With my older students, of course, I don't typically encourage students to track with their fingers or other tools... but for those who struggle with fluency or moving through the word to check all of the sounds, these special text tracking tools have really helped my students- and they LOVE when they get to use them, too!

Do you have any special tools that your guided reading groups LOVE getting to use?


9