Adventures in Literacy Land: Freebie

Showing posts with label Freebie. Show all posts

An Apple-icious Circle Story

Hello Friends!

I hope you find this post I've refurbished and resurrected from the Adventures in Literacy Land archives useful!  It features a delightful picture book and companion FREEBIE all about fall's favorite fruit! Enjoy!


Circle stories are a great way to help reinforce vocabulary, sequencing, and grammar skills with primary grade readers!


Red.

Green.

Ripe.

Juicy.

Tart.

Sour.

Sweet.

This list of adjectives could go on and on and round and round to describe apples--the signature fruit
that defines the taste of autumn for many of us!

In The Apple Pie That Papa Baked, author Lauren Thompson and illustrator Jonathon Bean capture a sensory sequence of sights, tastes, sounds, and events that ends with a tasty and surprising twist!  The language used is rich and descriptive, which makes the book a perfect mentor text for any fall lesson on adjectives!

Circle stories are a great way to help reinforce vocabulary, sequencing, and grammar skills with primary grade readers!


Circle stories are a great way to help reinforce vocabulary, sequencing, and grammar skills with primary grade readers!


Circle stories are a great way to help reinforce vocabulary, sequencing, and grammar skills with primary grade readers!


I was introduced to this book while listening to illustrator Jonathan Bean describe his detailed, three-layered illustration process this summer at the Mazza Museum Summer Institute.  It is a delightful circle story that takes the reader on a day's journey through an apple orchard with a farmer and his daughter.  Thompson's use of repetitive phrases compliments Bean's parade of whimsical pen-and-ink characters drawn in red, yellow, and black, and makes this story an ideal one to help young readers develop sequencing skills, practice fluency, and build vocabulary.  The book won the Ezra Jack Keats Award in 2008, and you can read reviews {HERE}.

I cannot wait to share The Apple Pie That Papa Baked with my second graders as we celebrate Johnny Appleseed's birthday this month!  I've created this FREE 15-page pack of literacy activities to use along with your book study, and hope that you'll enjoy incorporating them into your lessons as well!


Circle stories are a great way to help reinforce vocabulary, sequencing, and grammar skills with primary grade readers!


Circle stories are a great way to help reinforce vocabulary, sequencing, and grammar skills with primary grade readers!


I tried to make word and picture cards so that you could use them in a variety of ways, and hope that you will find them helpful as you plan your thematic lessons for the coming weeks!


Use a tri-fold board and velcro dots to help students retell the story 
in sequential order!


Circle stories are a great way to help reinforce vocabulary, sequencing, and grammar skills with primary grade readers!


Use the picture cards and craft sticks to create puppets for a Reader's Theater performance
of the story!


Circle stories are a great way to help reinforce vocabulary, sequencing, and grammar skills with primary grade readers!


Sort the nouns, verbs, adjectives, and pronouns in the story to 
help students practice categorizing the descriptive language and parts of speech
found in the story!


Circle stories are a great way to help reinforce vocabulary, sequencing, and grammar skills with primary grade readers!


Create verb, adjective, noun, and pronoun anchor charts to recall
words used in the story or generate new words related to the topic!


Circle stories are a great way to help reinforce vocabulary, sequencing, and grammar skills with primary grade readers!


Click {HERE} to download the file! 

 May the autumn days ahead be full cinnamon, spice, and apples all sliced!

Be sure to check out more thematic resources for Fall in my TpT store {HERE}!

Follow me on Pinterest for more creative classroom ideas and activities!


Know that I wish you delightful and delicious
reading and writing adventures!

Enjoy!


 Stories and Songs in Second


4

LISTEN UP...I'll make Listening Center one of your Favorite Centers

LISTEN UP...I'll make Listening Center one of your Favorite Centers
I don't know about you, but LISTENING CENTER used to be the bane of my existence.  Every week finding a new book…making sure it wasn’t too long…making sure the tape worked…making sure I had multiple copies…ugh.  Then, I finally figured it out:

I was making too many changes.

Teach Process, Change Product

LISTENING CENTER is another center that once the process is taught…you’re golden. 

For classroom set up purposes...we hang a sign where the students will work.  Every classroom is a little bit different, so I've had the listening center set up different ways.  Sometimes I have the tape player on the table where they will work.  The table also has a bucket with their listening center booklets.  Sometimes, there isn't a plug available...so I have the students lay on the floor and listen to the book, then go to the table with the booklets.  One year, I had my students keep their booklets with them in a file box they took to every center, every day.  Regardless, as long as you establish the place and keep it constant, it will be fine.

Setting a Purpose for Listening

The secret to loving the LISTENING CENTER?  I choose one book PER MONTH!  That’s right…just 1.  The students have 4 opportunities to hear the book, while the product for each week is different. Now, my LISTENING CENTER supports comprehension.  Each week we set a purpose for listening.

Week 1 – Students listen to the story.  

Then, write the title and the author on the cover of their LISTENING CENTER booklet (2 pages of manila paper, folded, and stapled).  At the beginning of the year, I write the title and author on sentence strips for the students to reference at the table.  Once I got a SmartBoard, I wrote the title and author on the SmartBoard for student reference.  Towards the middle of the year, I teach them to write the title using the books.

Week 2 – Students listen to the story.  

Students will write the main character names and either illustrate the characters or glue provided pictures from the story.  At the beginning of the year, we decide who the main characters are as a group and I write the names on sentence strips for reference at the center.  Later in the year, we discuss the characters orally, but they have to locate the names in the book.

Week 3 – Students listen to the story.  

Students will write about the setting in the story and write a phrase.  At the beginning of the year, we decide what the main setting is as a group and I write it on a sentence strip.  Once again, as the year goes on they have to locate the information in the book.

Week 4 – Students give their opinion.

Students listen to the story a final time and write a response to the story.  At the beginning of the year, I provide the sentence starter, “I like it when…”  As the year progresses they can choose, "I like it when..." or "I do not like it when..."  

Changing my LISTENING CENTER from a weekly book to a monthly book helped my students with reading comprehension.  My students could have book talks about the characters, setting, and events easily.


10

Teaching Split Digraphs


Hello everyone! 

It's Pixie Anne from Growing Little Learners here today to share a short post with you on my favourite activity when teaching split digraphs in the classroom.


It's a short post because we still have 17 more teaching days left over here in the UK and I know you can all appreciate that overwhelming feeling of wondering how on earth you are going to fit in all that learning that still needs to be done; squeeze in all the other crazy one off activities that seem to crop up at this time of year; trying to prepare the class for the new school year and pack up your classroom at the same time!

While there doesn't seem to be enough time left for all of those things, time is strangely going oh so slowly too... I've enjoyed my class a lot this year but I am ready for the term to end!

My little learners have done so well with their reading this year. I have seen HUGE improvements from every single child and am so proud of them all. I can honestly say that (apart from the several new arrivals I have had in the last month) my whole class have a pretty solid understanding of their letters and sounds which is very different from previous years!

One of our favourite activities in class this year when teaching split digraphs (or magic/silent 'e' if you prefer) has been this one:

Build the Word!


I hand out letter cards to at least half the class then ask them to come up to the front to build a word such as 'tie'. I make sure the children I have given the 'i' and 'e' too are friends so they won't mind holding hands to show that we know that those 2 letters together make the long vowel sound. 


I then ask for a different word such as 'tide' to be made. Chances are, if it our first encounter, the child holding the 'd' will place themselves at the end of the word. We discuss this and I thank the child for making such a brilliant mistake which we can all learn from and we move them to the correct position.

 It is really powerful for those two children holding the 'i' and 'e' to still hold hands as they make space for the 'd' so we can see that while they are apart now, they still make the same sound!


I ask other children if they are able to come up and make new words or call out specific words I would like built. We repeat with a different starting word such as lie, die or pie.


It's great to get the kids up and to use them as a resource rather than just using the interactive whiteboard or magnetic letters. It is a lot more engaging and memorable for them. It's easy to prep (handwritten on paper works just as well as fancy cards) and generates a lot of discussion and peer assessment - are they in the correct place? Thumbs up or down!

I have made a freebie for you based on the split digraph i-e so you can try it out (if you haven't used this idea before) in your classroom.


I'd love to hear how you teach split digraphs in your classroom so do please leave a comment below.

Thank for stopping by today!


0

Crafting Sentences Video and Freebie

 One year I was working with a group of first graders who were struggling with writing a complete sentence.  They were very good at using a capital letter at the beginning of the sentence and ending punctuation at the end of the sentence.  However, the middle part of the sentence was a little fuzzy for them.  The question I asked myself was, "How do I teach writing a complete thought to first graders?"


Instead of typing everything I did, I created a screen cast showing you the Smart Board Notebook I created to go with this lesson.  Click the video below for the lesson.  I also put up my Notebook file on SMART Exchange, and you can check out the file by clicking HERE.  Disclaimer:  I know that this doesn't work for every type of sentence, but it was great beginning for us to start writing complete thoughts.


To get the sentence graphic organizer and lesson plan I used with the lesson, click the image below.


crafting sentences


I hope everyone is having a fabulous summer!


 photo thinkingoutloudtitle.png
2

HELP! I don't know what to write about!

HELP! I don't know what to write about!

The key to teaching writing is to take away the fear and the excuses.  "I don't know what to write about," is the worst excuse EVER!  If your students give you this excuse, you need to rethink your brainstorming activities for Writer's Workshop.

Three ideas

1. Topic Cards 

I am an admitted thrift store junkie.  I have some thrift stores in the area I frequent for specific things. I go to the book section first.  Can't pass up children's books for 78 cents!  I also look for word books, but that's coming later.  Then I look for "Topic Cards."  Most people know these as flashcards, but they are really topic cards in disguise.  I put the cards in a container labeled "Topics."  If students want a new topic, they can choose a card.  Easy.  Last week I found old cards for a peg board (young teachers won't know what I'm talking about).  These cards didn't have words, but it was easy enough to add the words with a permanent marker.

2. Word Cards and Word Books

Seasonal or Topic-based Word Cards can provide students with many, many topics.  These word cards can be related to your state standards or could be fun word cards, like FIRE FIGHTERS!  This word card excites boys and girls. These Word Books or Picture Dictionaries are perfect topic books.  These books contain words with clear photographs.  

3. Vocabulary and Classroom Anchor Charts

Finally, using Vocabulary Anchor Charts in the classroom can provide a wonderful topics for your students.  They could want to write a new chapter for "Dinosaurs Before Dark" or they can write their own Jack and Annie story.  They might even want to write a completely different story about dinosaurs.  

I hope these ideas will end the "I don't know what to write about" excuses.


0

Word Work Without Worksheets!

Hello!

It's Jennifer from Stories and Songs in Second here to share one of those "fly-by-the-seat-of-my-pants" lessons that worked wonders yesterday when the copier was broken and my SmartBoard light bulb blew out!


When technology decided not to be my best friend--on a Monday morning no less--I had to pull out my "old school" supplies and improvise our Word Work lesson using the format of a party game that I'd recently seen played on Ellen and had enjoyed with friends a few weeks back.

If you've never experienced Heads Up, it is well worth a ninety-nine cent app download on your phone!  There is also another free app called Charades Kids that has many school-appropriate categories like Dr. Seuss, Fairy Tales, Animal Kingdom, and Countries.

My paper version of the game was easy and quick to make, and provided a new and engaging way for my second graders to meet our new list of Spelling words for the week!  No pencils or worksheets were required, but lots of oral language, phonemic awareness, and word meaning skills were still reviewed and reinforced!


It took me about fifteen minutes to make my word cards from index cards, staple two sentence strips together to make a headband, and cut and attach a sandwich-size Ziploc bag "word pocket" to the front. Once I explained the rules to my group, we had a grand time playing the game together!  Some students even asked to use the materials during indoor recess!


I've pulled together a quick FREEBIE for you {HERE} in case you want to try your own version of this activity!  I've included a 8.5 x 11 template as well as smaller blank word templates that you can print and laminate multiple copies for reuse with dry erase markers!  I hope your students enjoy it!


As always, thanks for sharing my story!  Know that I wish you all the best as your school year winds to a close.  May you continue to teach your children well and share the
wonder of words without worksheets with them!


2

Cross Checking: What it is and why your kids need it


Learning to read can be such a difficult task.  There are so many skills that are necessary, for a child to go from a non-reader to a reader.  Many children are fortunate enough to be read to at a young age.  These children are given the opportunity to experience books and enjoy them as a story.  Through this simple act, children learn that books tell a story and there are beautiful pictures to match.  Eventually, those same children will begin to pick up books on their own.  They will tell their own story according to the pictures that they see.  They are doing exactly what we, as adults, have modeled for them.  But they are still non-readers….

So how does a child go from reading the pictures of a story, to reading the words?  There are so many skills involved in this process that we could discuss it all day long.  Children need letter recognition, letter sounds, decoding, rhyming, phonemic awareness, concept of word, and the list goes on and on.   

Today, though, I am going to discuss one skill that many people often forget about.  It is one of those skills that seems to come naturally for some children and is very difficult for others.  It is one that we, as teachers, often forget to explicitly teach.  It is cross checking.

In my classroom, I use the Beanie Baby Decoding strategies to help many of my students remember these strategies they need for reading.  The first two strategies that I always teach to my non-readers are Lips the Fish and Eagle Eye.  These are the very basic beginnings of reading.  Lips the Fish reminds my students to get our lips ready to say the first sound in the word.  It gives them a starting point when reading the word.  Eagle Eye reminds students to look at the pictures to help them with unknown words.  I teach each of these skills explicitly and separate in my classroom.  Then, I go back and teach them together.  THAT is cross checking.

Cross checking is the ability of a student to use BOTH the picture on the page (or the meaning in the story for higher level readers) and the letters that create the word to determine the unknown word.  This means that child has to use both meaning AND visual cues while reading.  Most students have no problem doing one or the other, but combining them is a difficult task.

To teach this skill, I give my students several prompt cards that I designed specifically for teaching this strategy.  Each set has identical pictures, but with two different words that could describe that picture.  Often times, students will look at the picture and choose an obvious word for it without realizing that it could be something entirely different.

For example, this card has a fairly obvious word in it.  Students will look at this card and know that it is a picture of a horse and they will read “This is a horse.”

However, some stories may not use the word “horse.”  Some may use the word “pony.”  Students without the ability to cross check will look at this second card and read “This is a horse.”  They may not even notice that the word begins with the letter P rather than an H.


You will notice that I added our symbol for Lips the Fish and Eagle Eye to remind students that they need to use both strategies to determine what the sentence says!  

Here is another example:


 There are so many instances in stories in which this is such a necessary skill.  After I have taught this skill using these cards, it is time to try it in a book.  I then purposely choose a story or two in which they will have to use this skill to read the book accurately.  In a book, the picture cues are no longer there, so they may need to be reminded when they come across it the first couple of times.

As students become stronger readers, the pictures in the stories become fewer and fewer.  They also become more vague.  Students will no longer be able to use picture cues as often.  Instead, they will have to cross check by using meaning.  They will have to decide what word would not only match those letters, but would also make sense in the story.

If you would like a copy of the example cards that I have made, click here and check them out!

https://drive.google.com/file/d/0B2JG_UEUmfSqeFVQVTFYNVlGT3c/view?usp=sharing


2

Easy Prep Word Study Games

Hi! It's Jen from An Adventure in Literacy. I'm here today to share a few ideas for easy prep word study games you can use with any word cards or word features. Cathy wrote a great post a few weeks ago on making word study meaningful, so make sure you check out her post if you haven't already.


As a classroom teacher with a zillion things on my to do list I appreciate easy prep activities. I'm not talking about worksheets that are print and go, but truly engaging educational activities. If you are currently using Words Their Way, Word Journeys, or another word study program then your students already have word cards to use in these game ideas. The following games are automatically differentiated for each group when the students use their own word cards to play. 

An important part of word study is making sure that students are understanding the generalizations and features.  Traditional spelling activities like rainbow writing and stamping may be fun for the kids, but true word study games should help students focus on comparing and contrasting the word features, not just provide memorization practice. 

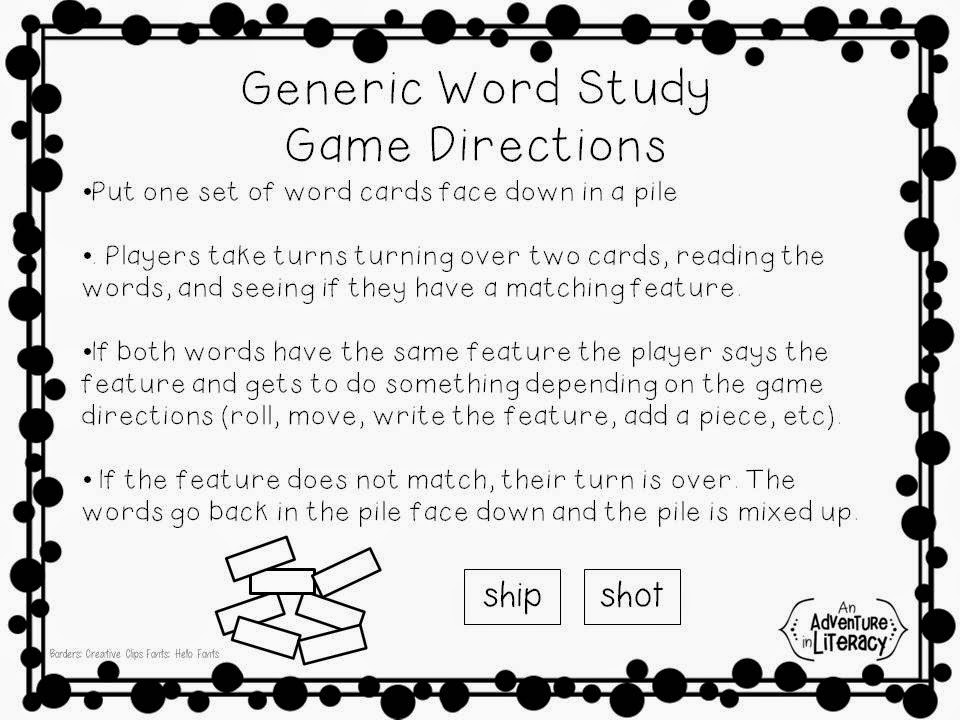
At the beginning of the year I teach my students the "generic" word study game rules. Once they understand the concept, this game can be slightly changed to add new novelty while still keeping the same rules and routines. Here are the basic word study game directions.


Now on to the fun part! Here are a few variations using the basic game directions and student word cards.

1. Gameboards
When students get a feature match they roll and move on the game board. I bet every teacher has a bunch of old game boards in your room that you can turn into word study games.


2. Erasers
Any Target dollar spot addicts out there? When students get a word feature match they take a fun themed eraser. Whoever has the most at the end wins. Don't these eraser hearts totally look like the real candies?


3. Math Manipulatives
What? Use math manipulatives for word study??? When students get a word feature match they add a unifix cube to try to see who can get the tallest stack. Or take a pattern block. Or take a link. You get the idea.

4. Dollar Tree Games
The Dollar Tree is great for having seasonal tic tac toe games or 2 player plastic race to the top games. When students get a word feature match they get to place an x or o or move their player forward 1 space.


5. Seasonal Cooperative Games
These take {a little} prep but they are a fun way to have students work together for a common goal. There is one large paper shape and students add something to it when they get a feature match. Examples include: a pumpkin with black triangles to make a jack-o-lantern, a turkey body with feathers, a Christmas tree with ornaments. If you are fortunate to have large die cuts, they work great for this.  If not, it takes about 5 minutes to cut out a shape. 


6. Drawing Games
Recently we played "Do You Want to Build a Snowman?". Until this year the game was just called "Draw a Snowman" but the excitement factor got bumped up thanks to Frozen! If students got a feature match they got to draw a part on their snowman. I just gave them a blank piece of paper {super low prep} and they got to choose what to add to their snowman {student choice for high engagement}. These were by no means works of art, but the kids had fun while practicing their words.


7. Dry Erase Games
Ok, I did make these to use in my class, but once they were made they became low prep. I just change out the seasonal boards each month. When students get a feature match they write the feature on the game board in the dry erase pocket (or page protector). The first player to get to the end or fill up their side of the board wins. You can grab a free copy of "Shadow Shuffle" because Groundhog Day will be here before you know it!


So there you have it. 7 low prep variations on the same game, all focusing on word features. I usually provide several of these games as options to give the students choice. I store them in a 10 drawer cart and change them out monthly. Students just pick a game, grab their words and play. Easy peasy.

A few closing remarks...
  • ·       Make sure the biggest focus is on word study, not the game. The game should be simple enough to compliment the feature practice.
  • ·         Continually change out the games to keep the students engaged. A lot of these games can be adapted for a holiday or month. Same rules, just a new look.
  • ·         You can add an accountability piece to the games by having students write the words they read on a recording sheet or word study notebook.  
I hope you got a few new word study ideas to work smarter not harder while kicking your word study games up a notch. What are your favorite word study games?  Leave us a comment- we love hearing new ideas!


5